Add-in usage:
Project Setup Add-in used to create any number of views (Floor Plan or Ceiling Plan) from an Excel file.
Video In YouTube:
Main Tabs:
Export Sample Excel File:
- Used to export the standard formate of the Excel sheet of the add-in.

Export Data:
- Used to export some of sensitive data we will need it while fill the Excel file.

Project Set Up:
- Contains some of tabs we will use to create the Views.

__________________________________________________
Project Set Up Tabs:
Import Excel File tab:
This tab used to check if there are an error in our data as follow:
- Sheet Number Errors : Check if there's any duplication of the Number in the sheet numbers column, as the Sheet number must be unique in the project.
- Level Errors : Check if the Level name is found in the project or not , i prefere to get the level name from the exported Excel data using COPY & PAST .
- View Name Errors : Check if there's any duplication of the View name in the View Name column.
- View Plane Type Errors: This addin create Floor Plane or Ceiling Plane only , Just type the name of the View Plane Type(Floor or Ceiling ).
- Scope Box Errors : Check if the Scope Box name is found in the project or not , i prefere to get the Scope Box name from the exported Excel data using COPY & PAST .
- Depends On View : if your project divided into some of parts, in this case you need an overall plane view and plane Views for the parts, the first Cell must be one of the previous created views, so it will be one of the project views names, the second cell will equal the first cell or the project views names ......etc.
Create Sheets tab:
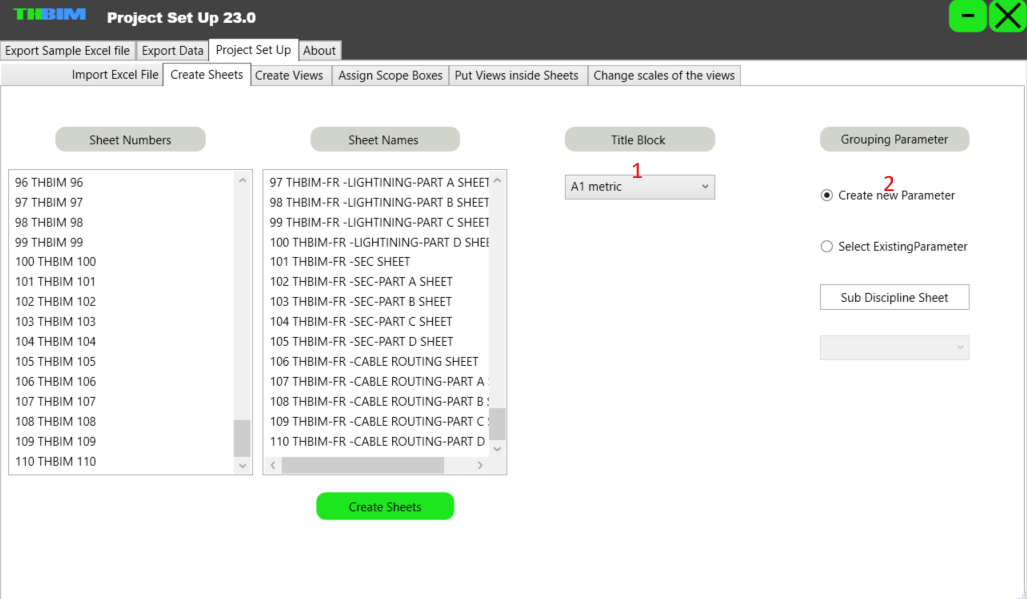
This tab is used to create sheets as follows:
- BlockTitle : we can select any title block we want.
- Filter Parameter: this parameter will have the sub-discipline of the sheet, we will use this parameter to customize our sheets easily.
How to Customize the sheets in Revit ?
This Screenshot is show the sheets before using the Parameter

to customize the sheets, Do these steps:

Right click on the Sheets , then click on the Browser Organisation then check "Sub Discipline Sheet" then select "Grouping and Sorting" then make the settings as shown then click OK then OK.

Create Views tab:

:This tab is used to create views as follows
- You can specify if you want all the views to be floor planes or ceiling plans or some if them are floor planes and the other are ceiling planes depending on the Excel File.
- To specify the Discipline of the Views.
- To Specify if you wan all the views to be independant or some of the views are depenedant on another views (as we said previously).
Assign Scope Boxes tab:

This tab used to assign the scope boxes to the created views
Put Sheets inside Views tab:

This tab used to put the created views inside the created sheets as follows:
- After you press on "Put Views in Sheets" button , the active view will be the first created sheet, you will be asked to select an two points to get the mid point between them to be the center of the view inside the sheet.
Change scales of the views tab:

If you find that the scale of the view is graeter than the sheet size you will need to use this tab as follows :
- If you want to change the scales of the views, just return to the Excel File and change the scale values then save the file, after that return here and click "Reload Excel File" you will find the new scales appeare in "View Scales" List, Just Click "Change The Scales Of The Views Ports".
________________________________________________
If you reach here , i hope this add-in is helpful.
- Comment and tell me What's your opinion about the addin?
- and tell me if there is any suggestion to improve it?
Contacts to get TH-BIM add-in:
Email: Mahmoud.Taha.Abdalaziz@gmail.com
WhatsApp: +201121721305
Hi Taha, can you spill for create the tools ? maybe for tutorial basic, thanks
ReplyDelete